Understanding the laminate flooring installation plano process helps homeowners in Plano make informed decisions about updating their floors with a durable and attractive option that suits local living conditions. Laminate offers a practical surface that resists scratches from daily foot traffic while mimicking the look of hardwood or tile at a more accessible price point. Families in the area often deal with temperature swings and occasional humidity changes, so proper installation techniques become essential to prevent buckling or gaps over time. A1 Flooring and Granite focuses on thorough preparation and precise execution so the finished floors perform well in Plano homes for years.
Before any materials arrive on site, professionals evaluate the existing subfloor condition, check for levelness, and address moisture concerns common in Texas construction. This initial assessment prevents future issues that could arise from uneven surfaces or hidden water damage. Homeowners benefit from learning the full workflow because it clarifies what to expect during the project and highlights the value of professional handling versus DIY attempts that often overlook critical details like expansion gaps or acclimation periods.
Preparing Your Plano Home for Laminate Flooring Installation
Successful laminate flooring installation plano begins with careful room preparation that minimizes disruption to daily routines. Start by removing all furniture, appliances, and existing floor coverings down to the bare subfloor. In Plano homes with carpet or vinyl, this step reveals the true condition underneath and allows inspection for squeaks or soft spots that need repair. Professionals use moisture meters to test concrete slabs or wood subfloors, since excess humidity can cause laminate to expand or warp after installation.
Next, address any leveling requirements. Plano properties built on slab foundations sometimes develop minor dips or ridges that must be corrected with patching compounds or self-leveling underlayment. Skirting boards and door casings are trimmed to allow the new flooring to slide underneath for a clean finish. Electrical outlets and HVAC registers receive attention so transitions remain smooth and safe. Allowing the laminate planks to acclimate in the home for at least 48 hours before cutting helps them adjust to local temperature and humidity levels, reducing the chance of movement later.
Selecting Laminate and Underlayment for Plano Conditions
Choosing the right laminate thickness and wear layer rating ensures the floor handles Plano household demands such as pets, children, and frequent entertaining. Thicker planks with higher AC ratings provide better sound absorption and dent resistance in high-traffic zones like hallways and living rooms. Underlayment plays a key role in the overall system by adding cushion, reducing noise transmission to lower levels, and creating a moisture barrier when installed over concrete.
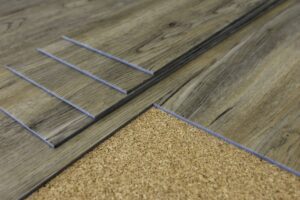
laminate floor underlayment tips include selecting products that match the subfloor type. Foam underlayment works well over wood subfloors for added comfort, while cork or rubber options offer superior soundproofing in multi-story Plano homes. Always overlap seams with tape to maintain the moisture barrier and avoid leaving gaps that could allow humidity to reach the laminate. Professionals often combine underlayment with a thin vapor retarder on slab foundations to meet manufacturer requirements and local building expectations.
Step-by-Step Laminate Flooring Installation Process
The actual installation follows a logical sequence that starts in a corner and works outward. Installers snap the first row of planks along the longest straight wall, maintaining a consistent expansion gap of about three-eighths of an inch using spacers. Subsequent rows are staggered so end joints do not align, which distributes stress evenly across the floor and improves stability. Click-lock systems allow planks to connect without glue, speeding the process while still creating a tight seam.
Cutting planks to fit around doorways, vents, and irregular walls requires precision tools such as a laminate cutter or fine-tooth saw. In Plano homes with open floor plans, installers plan transitions between rooms carefully to maintain visual flow. Thresholds and moldings are added last to cover expansion gaps and create finished edges against cabinets or exterior doors. The entire workflow typically takes one to three days depending on square footage and any unexpected subfloor repairs discovered during prep.
- Inspect and repair subfloor for flatness within manufacturer tolerances
- Install underlayment with sealed seams for moisture protection
- Acclimate planks inside the home before beginning cuts
- Begin laying from the longest wall, maintaining expansion gaps
- Stagger joints and check alignment frequently with a tapping block
- Finish with baseboards and transition pieces for a polished look
Aftercare and Long-Term Performance in Plano Homes
Once installation completes, allow 24 hours before moving heavy furniture back into the rooms. Regular sweeping or vacuuming with a soft brush attachment removes grit that could scratch the surface. Damp mopping with manufacturer-approved cleaners keeps the floor looking new without introducing excess water that might seep into seams. Area rugs near entryways trap dirt and reduce wear in high-traffic paths common in Plano family homes.
Professional installation also includes guidance on warranty registration and recommended maintenance schedules. This support helps homeowners protect their investment and address minor issues before they become larger problems. For those considering updates beyond flooring, related remodeling projects can coordinate timing to minimize overall disruption.
FAQ
How long does the full laminate flooring installation plano process usually take?
Most Plano homes require two to four days total when including subfloor prep, acclimation, and finishing details. Larger open spaces or homes needing extensive leveling may extend the timeline slightly, but crews work efficiently to restore normal access quickly.
What underlayment options perform best over concrete slabs in Plano?
Moisture-resistant foam or cork underlayment with an attached vapor barrier provides reliable protection against slab humidity while adding comfort underfoot. Professionals match the product to the specific laminate brand for optimal performance and warranty compliance.
Can laminate be installed over existing tile or hardwood in older Plano homes?
Yes, provided the existing surface is solid, level, and free of loose tiles or squeaks. A thin underlayment layer often bridges minor imperfections, though removal is sometimes recommended for the best long-term results.
Do homeowners need to stay out of the house during laminate installation?
Only the rooms being worked on require limited access. Many families continue using other areas of the home while crews complete the project, with final cleanup restoring full use within a day or two after completion.
Is professional installation worth the cost compared to DIY laminate projects?
Professional crews bring specialized tools, experience with subfloor issues common in the area, and knowledge of manufacturer requirements that protect warranties. This approach reduces the risk of costly mistakes that often appear months later in DIY efforts.
Ready to update your floors with a smooth laminate flooring installation plano experience? Contact A1 Flooring and Granite today to discuss your project details and schedule an in-home consultation. Call (214) 441-7795 or visit the Plano, TX service page for more information. Explore Request a flooring or granite estimate to get started, or learn about related services such as Kitchen Remodeling in Plano.
If this is still a planning read, how to pick hardwood and granite vs quartz cover the two choices people ask about most. Ready to move? Request a quote.